

Personal
Project
Exhibition
Max van't Noordende
Due to corona, the facilities and the options to display our Personal Project were quite limited. This website is an interactive visual tour of my project, titled "Switch". A board game created by Max van't Noordende, a student of MYP5A, with its own original rules and original design, taking the shape of a portable, and openable box. The website follows the process of its creation, starting by the planning, and ends with the final product. Here is the meet link:
Process Taking ACtion
Process
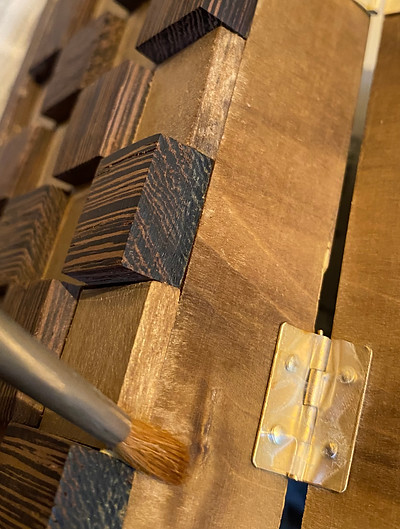
After having gathered all the resources necessary and pertinent to my project, started the plotting of parts onto the wood. I used my drawings to inform me on the size of the pieces and on which type of wood I needed to plot it. The lighter wood was used for the entire box as well as half the checker pattern on top, and the darker wood was only used to complete the checker board pattern atop the box. After plotting the parts, I started experimenting with how to cut the pieces, practicing my skills and working my way up from the easiest to cut to the hardest wood to cut. The two types of wood were tulpenhout (magnolia wood in english), and wengé (a tropical wood). The tulpenhout, being lighter and less dense was easier to cut so I started with it. It also came in two thicknesses so I started with the thinner of the two, then the thicker and then moved on to the darker wood. Sometimes I would take breaks from cutting and start sanding some of the pieces till I could glue them with some other pieces. While cutting the darker pieces, I started clamping and gluing parts of the tulpenhout box together. Therefore, after having finished cutting all the pieces, I already created the boxes and was pretty much ready to glue the coloured squares on top of it. However, first I had to thoroughly sand them, and plan out where each piece would go as to ensure they fit the best way possible. I started by gluing the lighter pieces let them dry. The next day I glued the darker pieces.
After that I still needed to cut all the pieces of the game, however because the pieces are so small it did not take too long. I sanded them and then started the painting process. First by lacquering the box and then the pieces, letting them dry overnight. Finally, I painted the edges of checkerboard with a second paint to try and make them darker. It only worked to a certain extent. After that, the product was ready to be handed in.

Materials
The first steps after having researched and planned out my idea were to first of all, create a detailed drawing of how it would look like which included precise measurements. Although this could also be seen as part of the planning process. Thereafter I had to gather the materials and tools I needed before I could start with anything, the materials included felt, two types of wood (with varying thicknesses), wood glue, wood filler, and wood lacquer. he tools were made up of two types of sandpaper, a small, hardback saw, two clamps and a paintbrush (as well as turpentine).
Problems

However, the process did not go so easily as it sounds in the previous paragraphs. Some hiccups that occurred are the following: it took the wood shop three weeks to finish getting my wood ready, severely reducing my time available. After the wood was ready I realized that they did not provide me with to thicknesses of the darker wood, the thinner of which was needed for the checkerboard pattern atop the box, also the most prominent feature of my product. I worked around it by simply having thicker pieces on top and having two heights of pieces on top of the box, and incorporating it into the unique features of the box. Finally the last issue was a mistake of my own, I did not take into account that asymmetry present in a checkerboard pattern and accidentally made the two halves of the box not match up. I was not able to resolve it and decided to keep it as a feature which makes my board game more original.
During the entirety of this project, I discovered many things concerning the handling of wood, whether its about cutting it, sanding it or panting it. I also discovered more about my skills on the topic, and improved them during the length of the project.


